For this tutorial, let’s pretend you have an ASP.NET MVC application written in C# that accepts user comments. Imagine the power in leveraging Amazon Translate to accurately and efficiently translate user comments into other languages.
The purpose of this article is to provide a high-level overview on implementing Amazon Translate using C# within an ASP.NET MVC application.
- A user submits a comment, written in English, to your MVC application.
- The user’s comment is translated to Chinese, French, and German using Amazon Translate.
What Is Amazon Translate?
Amazon Translate is a neural network capable of accurately translating from English to Arabic, Chinese (Simplified), Chinese (Traditional), Czech, French, German, Italian, Japanese, Portuguese, Russian, Spanish, and Turkish. Amazon translate is also capable of translating text for any of the supported languages back to English.
Amazon Translate leverages sophisticated attention mechanisms to comprehend context. This allows Amazon Translate to better decide which elements in the source are most important for deciding the next target word. Attention mechanisms help to ensure that the API accurately translates ambiguous phrases or words.
Getting Your Amazon Translation API Key
You’re going to need an AWS Access Key ID and a AWS Secret Access Key to send requests to Amazon Translate. For the purposes of this article, I’m assuming you have a AWS account already.
Create an IAM User
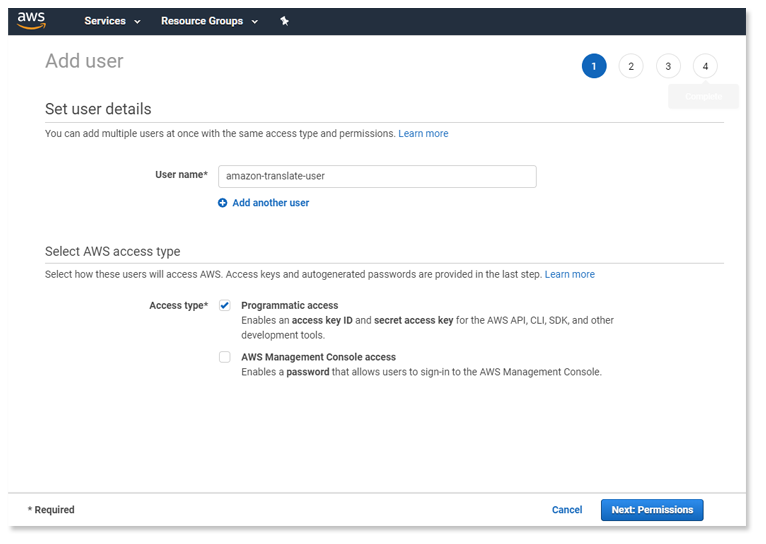
We need to create a new user within AWS Identity and Access Management (IAM). We’re going to check the Programmatic access option, which will provide this user with the access id and secret key required to make calls to Amazon Translate.
You’re going to specify a username. In the screenshot below, my user’s name is amazon-translate-user, but you can name the user whatever you please.

Upon successful creation of your new IAM user, you’ll have the option to download the credentials required to call the Amazon Translate service.
Preparing Your MVC Project
In an effort to drive adoption, Amazon publishes a suite of packages to make integration with AWS as painless as possible. For our purposes, there are two NUGET packages we’re going to include to jump start our integration.
AWSSDK.Core
First, add the AWS Core package to your Visual Studio project. This package provides the necessary framework for integrating with AWS, which includes the functionality needed for authentication.
|
1 |
PM > Install-Package AWSSDK.Core |
AWSSDK.Translate
Second, add the AWSSDK – Amazon Translate package to your Visual Studio project. This package provides the functionality for processing the actual language translations through Amazon.
|
1 |
PM > Install-Package AWSSDK.Translate |
Creating Our Models
We need to create a ViewModel for passing in the user’s comment along with the requested language into our Controller.
We’re also going to create a ViewModel for displaying the translated text to the user.
|
1 2 3 4 5 6 7 8 9 10 11 12 13 14 15 16 17 18 19 20 21 22 23 24 |
public class TranslateCommentViewModel { public string SubmitterName { get; set; } public string CommentText { get; set; } public string TargetLanguage { get; set; } public List<SelectListItem> TargetLanguages { get; set; } public TranslateCommentViewModel() { // Set up the target language select TargetLanguages = new List<SelectListItem>(); TargetLanguages.Add(new SelectListItem() { Text = "Select...", Value = string.Empty }); TargetLanguages.Add(new SelectListItem() { Text = "Chinese - Simplified (zh)", Value = "zh" }); TargetLanguages.Add(new SelectListItem() { Text = "French (fr)", Value = "fr" }); TargetLanguages.Add(new SelectListItem() { Text = "German (de)", Value = "de" }); } } public class TranslatedCommentViewModel { public string SubmitterName { get; set; } public string CommentText { get; set; } public string TargetLangauge { get; set; } public TranslateTextResponse TranslateResponse { get; set; } } |
TranslateCommentViewModel and TranslatedCommentViewModel. I probably should not have named these ViewModels so close to one another. They are, in fact, two separate objects.The TranslateCommentViewModel is part of the user’s request and is designed to accept the submitter’s name, the actual text to be translated named CommentText, and the language we’ll be translating to, which I’m calling TargetLanguage.
The TranslatedCommentViewModel is the response to the user and includes the submitter’s name, the original comment text, the target language, and, most importantly, the TranslateTextResponse. The TranslateTextResponse is being returned from the Amazon.Translate.Model namespace.
In the real-world, I probably wouldn’t return the actual Amazon model TranslateTextResponse as part of the ViewModel, but let’s assume it’s OK for the purpose of this article.
Creating Our Controller Actions
We’re going to have two actions within our Controller. The first action, called AddComment, will be a Get used to display the comment form to the user. The second action, we’ll call TranslateComment, will be a Post where the actual integration with Amazon Translate resides.
|
1 2 3 4 5 |
public ActionResult AddComment() { var model = new TranslateCommentViewModel(); return View(model); } |
Here’s Where the Magic Happens!
The code below is where the text is sent to Amazon Translate for the actual translation.
 First, we create a new
 AmazonTranslateClient. You’ll want to include your AWS access key and secret key. You’ll also need to specify your desired AWS region endpoint.
Next, we need to instantiate the TranslateTextRequest that we’ll be sending to the Amazon Translate API. For the sake of this demo, we’re always translating from English. Therefore, we’re setting the SourceLanguageCode as “en”. However, this could easily be expanding for translating from other source languages. We also need to specify the TargetLanguageCode, which was selected by the user.
|
1 2 3 4 5 6 7 8 9 10 11 12 13 14 |
[HttpPost] public ActionResult TranslateComment(TranslateCommentViewModel comment) { var translate = new AmazonTranslateClient("[YOUR-AWS-ACCESS-KEY]", "[YOUR-AWS-SECRET-KEY]", RegionEndpoint.USEast1); var request = new TranslateTextRequest() { Text = comment.CommentText, SourceLanguageCode = "en", TargetLanguageCode = comment.TargetLanguage }; var model = new TranslatedCommentViewModel() { CommentText = comment.CommentText, SubmitterName = comment.SubmitterName, TargetLangauge = comment.TargetLanguage, TranslateResponse = translate.TranslateText(request) // Make the actual call to Amazon Translate }; return View(model); } |
Creating Our Views
Add Comment View
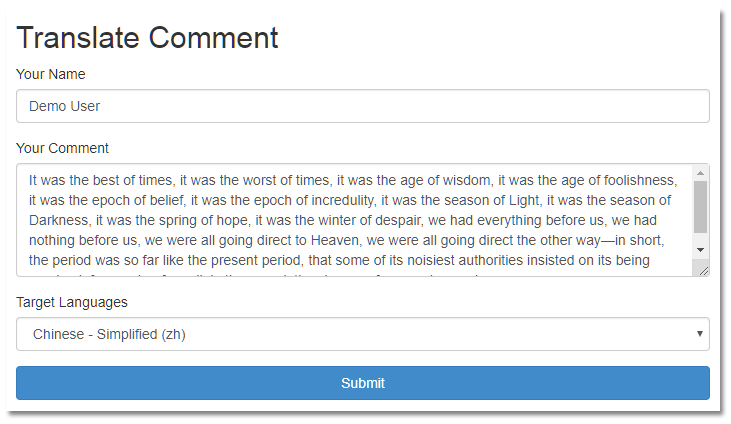
The first view displays a form for the user to enter their comment. This comment form posts to the action TranslateComment.
|
1 2 3 4 5 6 7 8 9 10 11 12 13 14 15 16 17 18 19 20 21 22 |
@model AWSTranslateMVC.Models.TranslateCommentViewModel @{ ViewBag.Title = "Add Comment"; } <h2>Translate Comment</h2> @using (Html.BeginForm("TranslateComment", "AWSTranslate", FormMethod.Post)) { @Html.AntiForgeryToken() <div class="form-group"> <label>Your Name</label> @Html.TextBoxFor(model => model.SubmitterName, new { @class = "form-control" }) </div> <div class="form-group"> <label>Your Comment</label> @Html.TextAreaFor(model => model.CommentText, new { @class = "form-control", @cols = 40, @rows = 5 }) </div> <div class="form-group"> <label>Target Languages</label> @Html.DropDownListFor(m => m.TargetLanguage, Model.TargetLanguages, new { @class = "form-control" }) </div> <button type="submit" class="btn btn-block btn-primary">Submit</button> } |

Translate Comment View
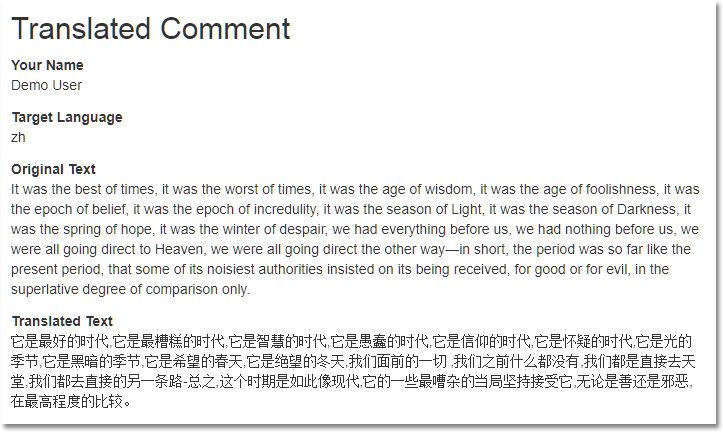
The send view displays the actual translated text..
|
1 2 3 4 5 6 7 8 9 10 11 12 13 14 15 16 17 18 19 20 21 |
@model AWSTranslateMVC.Models.TranslatedCommentViewModel @{ ViewBag.Title = "Translated Comment"; } <h2>Translated Comment</h2> <div class="row"> <div class="col-lg-2"><strong>Your Name</strong></div> <div class="col-lg-10">@Model.SubmitterName</div> </div> <div class="row"> <div class="col-lg-2"><strong>Target Language</strong></div> <div class="col-lg-10">@Model.TargetLangauge</div> </div> <div class="row"> <div class="col-lg-2"><strong>Original Text</strong></div> <div class="col-lg-10">@Model.CommentText</div> </div> <div class="row"> <div class="col-lg-2"><strong>Translated Text</strong></div> <div class="col-lg-10">@Model.TranslateResponse.TranslatedText</div> </div> |

Leveraging Amazon Translate In Your Applications
Well, there you have it! As you can see, it’s not too difficult to integrate Amazon Translate into your applications. I’ll let you in on a secret, the Google Translate integration is the exact same approach.
Thanks for reading, I hope you found this useful.
Josh Greenberg is a developer, partner, and founder at Codemoto based in Boulder, Colorado. I’ve been developing commercial web applications for the last twenty years. With a long history in C#, ASP.NET, MVC, I’ve been mostly focused on full-stack React and .NET Core development for the past few years.


Nice article! There isn’t a ton of info on integrating machine translation into apps yet. Much appreciated.
Thanks Jake. Glad you found it worthwhile.
I was recently tasked with integrating machine translation into our mobile app. This tutorial really helped jump start the process. Thanks for taking the time to put together this tutorial.
Can we use aws translate on webform where having multiple fileds. Is there any function where we can pass input text of all fields once and get the output.
in ASP.NET MVC web application